Posted on

Gift wrapping ideas for Father's Day

fathers day gift wrapping shirt gift bag

So you’ve got the Father’s Day card and gift, but you need a way to present them nicely to your Dad… I love to wrap presents up in interesting, fun or just plain gorgeous ways. So I’ve been doing my research to find some clever gift wrapping ideas for Father’s Day. And I’m sharing them with you, you lucky duck!

I should also mention that I’m not a massive fan of buying big rolls of wrapping paper. It just seems so wasteful. I can be a bit tight sometimes but also, you know, the environment! So I love the idea of reusing old wrapping paper, gift bags and other bits I have lying around the house.

DIY gift bags

diy gift bag
Brown paper gift bag

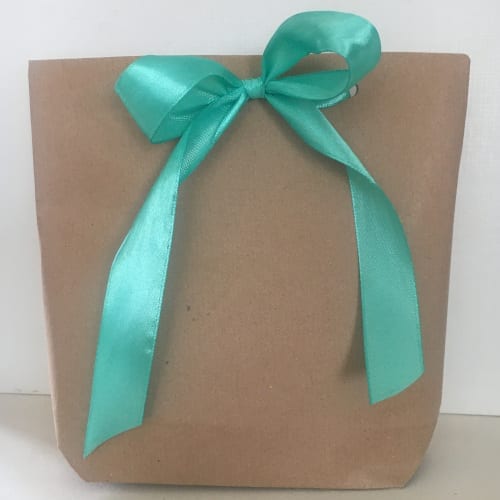
Gift bags are so easy if you have something awkwardly shaped or a few bits and pieces to put together. And they can be reused by your Dad next time he gives a gift so he’ll be grateful for that too 😄

You can easily make your own gift bags from old (or new) wrapping paper, brown paper or even newspaper. And you can also make them exactly the right size. (Am I the only person who can never find a bag that’s not too wide or too tall for the present I’ve bought?!)

This tutorial shows you how to make a DIY gift bag (the examples are for Christmas but obviously apply to Father’s Day too. However I think the tartan is great for Dads at any time of year!) Here’s one I made on the left. I just used an ordinary hole punch, so you don’t need a rectangular punch as suggested.

fathers day gift wrapping bottle
My effort

Bottle wrapping ideas

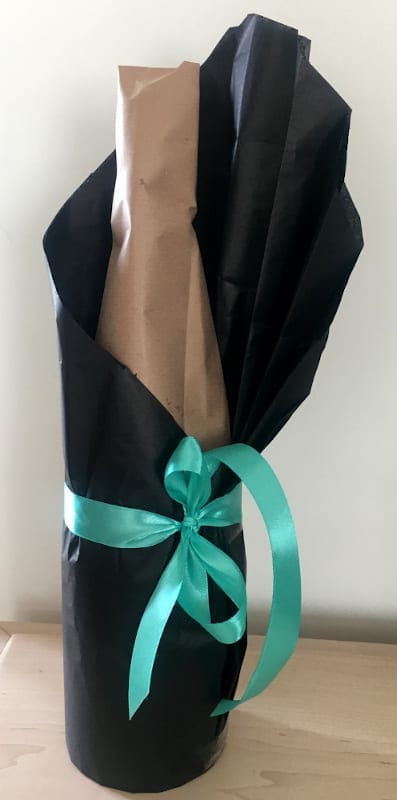
If you’ve chosen a boozy gift for your Dad then this YouTube video on how to wrap a bottle might come in handy.
I must admit I didn’t like that you could still see what the bottle was inside, so I added a paper ‘cap’ to the top of the bottle to cover it. I used black tissue paper, brown paper for the cap and that same teal ribbon. Next time I’ll also use double sided tape instead of sellotape as I think it will look neater. My effort is on the right…

Clever decorative touches for your wrapping

A gift wrapped in plain white or brown paper or newspaper can be made to look extra special with a few clever decorative touches. I saw an idea on iStock where a gift was tied up with a tape measure bow which I thought was a terrific idea for a Dad who’s a DIY enthusiast.

You can also stick interesting bits and pieces straight onto the wrapping paper.

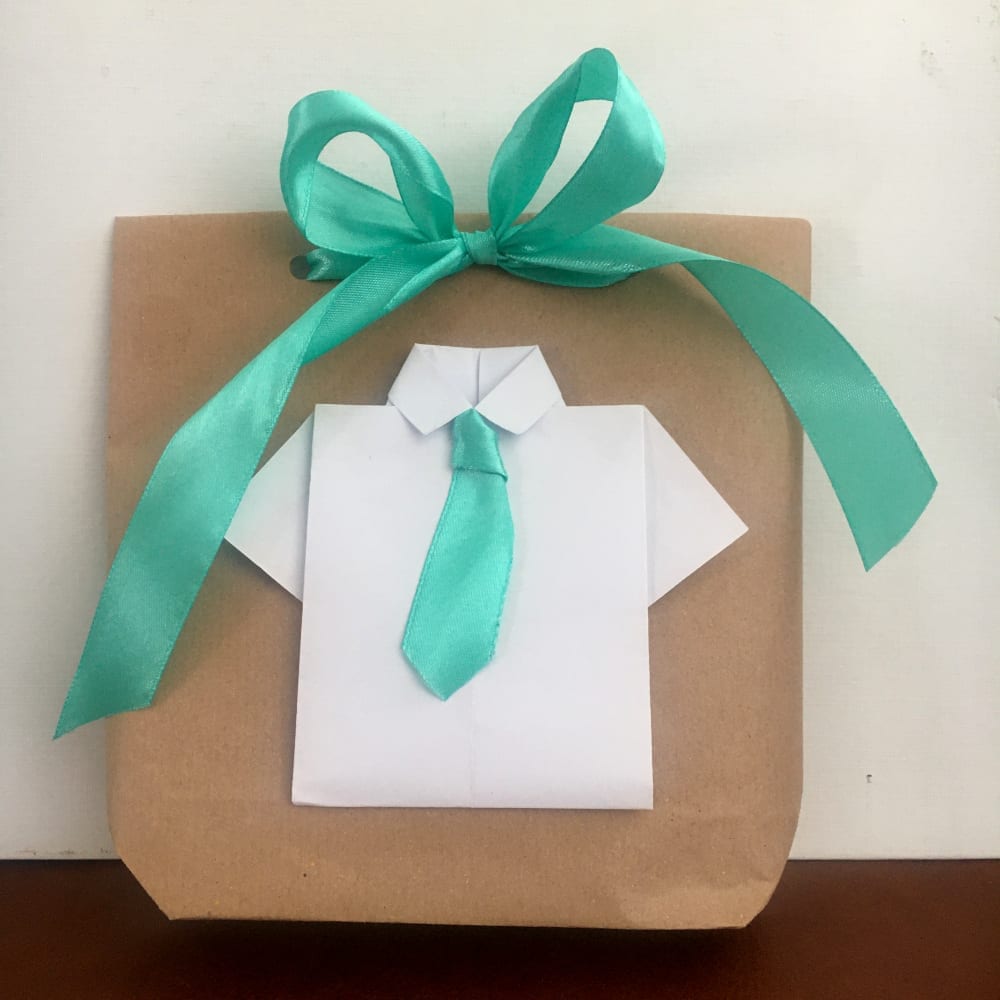
Here’s a tutorial for an origami shirt that you can fold yourself. I made mine from an A5 piece of plain white printer paper. I used some ribbon for the tie (yes, it’s that same teal ribbon again…) Of course, you could add a bow tie, pockets or buttons instead if you wanted to. Stick it onto a card, a wrapped present or a gift bag like I’ve done and it makes it that much cuter. You could also fold money or a printed Amazon voucher to make these types of paper gifts look more interesting!

More ideas

DIY Gift Wrapping Idea for Musicians by Curious Doodles

Here are some other gift wrapping ideas I found…

I hope you’ve found this helpful. My Dad tends to get the same types of gifts over and over (booze, chocolates, etc). He doesn’t really need anything else. So by putting in a bit of extra effort with the presentation, he knows I’ve still put some thought into it. That’s got to earn me some brownie points, right? 😁

If you try any of these gift wrapping ideas, or something new inspired by them, please share on social media and tag me. I’d really love to see how your efforts come out!

Posted on

My custom cartoon portrait process

Custom cartoon portrait process

I’ve been doing a lot of custom cartoon portrait orders for cards and prints over the last few years. People just seem to love seeing themselves and others in cartoon form! Read on to find out how I go about creating my stick figure portraits step by step…

First steps

When I get an order for a cartoon portrait card or print the first thing I do is get in touch with the customer to ask them to send photos and find out if they have any preferences regarding outfits, etc. If the photos show anyone both with and without glasses or a beard then I’ll double check which version they want. (I did once get two photos of someone’s Dad for a personalised birthday card which both showed him with a beard, and I was only when I sent the first proof that she told me he no longer had a beard… in a tone that seemed surprised I didn’t know this…)

Once I have the photos and other information I need to get started I open up my sketchbook and get started.

Layout of each custom cartoon portrait

I begin by very roughly sketching stick figures on the page in the positions and poses I want them in. This is helpful for getting proportions right in even one person portraits but is especially important when I’m doing larger family portraits for making sure they’re balanced. Check out this example from a family cartoon portrait I worked on recently:

Custom cartoon portrait layout
This sketch shows roughly where each family member will be in relation to each other.

I sometimes send this to the customer to check they’re happy with the layout, but usually only if there are at least four people in a family portrait.

Filling in the detail

The next step is to start working on each person’s head, working from the photos. This is the most important bit to get right in order for the customer to recognise the real people from the cartoon versions.

Custom cartoon portrait heads sketch
Here I used pencil to draw the detail of each person’s head and try to capture their likeness

Once happy with that I’ll move on to the bodies and add in any props or pets. You can faintly see how I draw the bodies and clothes around the original stick figure sketches.

pencil sketch of family
This example shows the pencil sketch once finished

I try to make sure I’m completely happy with this step before I move on, as it’s much easier to draw with pencil than to edit digitally later on. When I’m content that I’ve captured each person’s likeness I’ll use my Tombow brush pens* to go over the pencil in black ink. If necessary I’ll use my Derwent Graphik line maker pens* for any very fine details before rubbing out the pencil marks.

Inked sketch
This shows the inked version in my sketchpad – ready to scan in

Digitising the sketch

The drawing is now ready to scan in. I use the ‘Text’ setting in black and white to get the sharpest outlines I can. I leave the image rasterised rather than converting it to a line drawing as otherwise some of the detail can be lost and it also looks less hand drawn.

Custom cartoon portrait scanned
Here’s what the digital image looked like once it was scanned in

At this point I leave my pens and pencils behind and do all the rest of the editing digitally. I sharpen up the contrast and remove any marks that have come through on the scan but shouldn’t be there. I also fix any slips or mistakes I may have made in the inking stage.

Time to add colour! All the colour is digitally added, to make it easier to make any colour changes if the customer asks for them. I send a first proof to the customer to get their feedback once I’m happy with the digital image and colours .

cartoon portrait sketch first proof
Here’s the first proof I sent to the customer with colour added

Final edits

A lot of the time the customer accepts the first proof. However it also often happens that they ask for colour changes or realise that the photo they sent showed an older hairstyle, facial hair or glasses.

In the example above I’d been given instructions for outfits of two of the family members but omitted to check what the others should wear and did my own thing. This was foolish of me… In this case the customer felt that the two figures in orange and blue were too casual looking in relation to the rest. As a result I needed to digitally redraw these two outfits. (She also asked for a few colour changes but these are very easily done.) I’m now trying to ask more questions and get as much detail as possible before starting. This is much easier than having to edit digitally later, and I’m hopefully getting better at remembering to do this!

The finished product – how this custom cartoon portrait turned out

Once I’d made these edits and send a second proof the customer was very happy with her family portrait. I’ll always keep going until the customer is completely satisfied with what I’ve created! Here’s the finished product:

The final cartoon family portrait as sent to the customer

She also asked me to sign the portrait as she said I should get credit for my artwork, which I thought was really lovely of her! I’ve also done quite a few other cartoon portraits for her, so despite my mistake she remained a very loyal customer 🙂

So that’s my process! I love doing custom cartoon portraits. They result in me having a lot more interaction with my customers than I do with ready to ship orders that are just printed and posted off. Some really terrific customers come back again and again and I’m always so pleased to hear from them when they ask for another custom cartoon portrait for a new occasion.

Take a look at the range in my shop to see examples of all the different custom cartoon portrait cards and prints that I offer.

* These are affiliate links, which means that if you click on them and buy I will get a tiny commission on that product – it doesn’t cost you anything though! And I only add affiliate links to products I actually like and use (of course).

Posted on

Free colouring in pages for kids

Free colouring in pages

We’ve all been in lockdown for a while now, so I hope you’re all doing ok. It must be particularly difficult if you have young children at home to entertain, so I wanted to do what I could to help. I’m offering some free colouring in pages for kids which you can download and print off to keep them amused for a little while at least! Continue reading Free colouring in pages for kids

Posted on

Beer illustrations

Beer illustrations

It’s starting to look a bit like I’m obsessed with alcohol… (who me?!) These beer illustrations follow on from the cocktail illustrations I did last week. I’m not actually much of a fan of beer, though I don’t mind half a pint of Guinness now and then, or the very occasional lager on a particularly hot day.
Continue reading Beer illustrations

Posted on

Cocktail illustrations

Cocktail Illustrations

These cocktail illustrations were inspired by a brilliant girly week away I had with some friends last week. I’m usually more of a wine girl, but it was so hot that the icy cocktails were really hitting the spot! We went to Lanzarote and, although it turns out it was just as hot in the UK, it was great to be able to enjoy the good weather with a pool, cocktails and no work to do 🙂 Continue reading Cocktail illustrations